What happens at JOG
A step-by-step guide to attending a JOG, from getting there, preparing, starting, running your course and finishing.
About JOG
The Junior Orienteering Group is open to all those interested in trying orienteering or in developing their skills and fitness. Sessions are held around the Taunton, Blackdowns and Quantocks area most weekends - timings and locations can be found in the Events listing.
What to Bring
All you need are a pair of trainers and clothes you can walk/jog/run in (its up to you how fast you want to go). Full leg covering (ie not shorts) is recommended for your protection from scratches.
Getting There
The webpage for each session will have various ways to locate it – including postcode, online map links, and even What3Words. In most cases, there’ll be white and red orienteering signs placed to direct you from a main road.
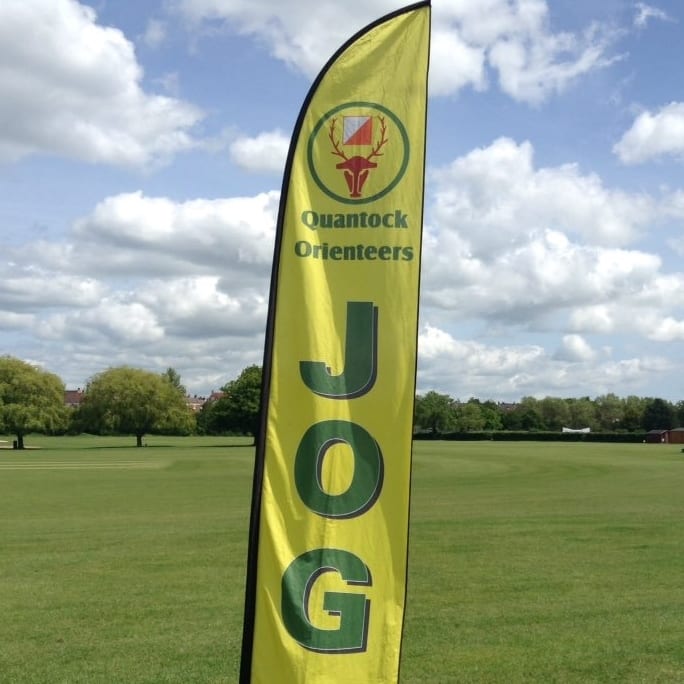
Once you’ve parked, look out for the yellow and green JOG banner.
(Please note that the price has increased since this video was made!)
Registering
Near the banner, there will be several tables laid out. You work your way through in order.
Step 0: If this is your first ever JOG, fill in a registration slip. If you can download this one and complete it in advance, it’ll make it easier on the day.
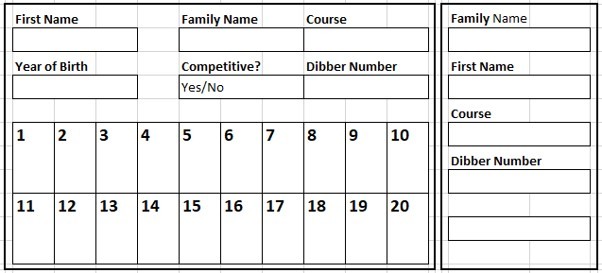
Step 1: Fill in a control slip. If you are going in a pair or group, put all names on.
You’ll need to give your name, year of birth and which course you are doing. For descriptions of the courses at JOG, see here. If it is your first run of the day and you want it to count for the league scores, mark it as competitive; otherwise mark it as non-competitive. Leave the bit about dibber number blank.
Please remember to fill in both parts of the slip - one will go out with you and the other will be kept as part of our safety process.
Step 2: Pay and collect your map. You’ll need to tell the person manning this table which course you want to do.
On this step you can also borrow a compass and whistle if you want.
Step 3: Finally, your entry will be processed. Hand over your control slip (and registration slip if this is your first time) to the person with the laptop.
The control slip will have the end cut off and the main bit given back to you. Use one of the supplied safety pins to attach it to the bottom hem of your top.
You will also be given an electronic dibber and shown how to wear it on your finger.
Understanding the Map
To start with, you’re probably going to be focussing on paths. These are black dashed lines. Other things worth noting are that yellow means grass, white or green means woodland, and blue means water. Don’t worry if you can’t remember – all the symbols and colours will be printed in a key on the map.
Your course is marked in purply-pink. It starts with a triangle, then there are a series of numbered circles (called controls), and ends with a double circle. You have to go to each one in order. You do not have to follow the line joining each control.
Somewhere on your map there will be the control descriptions. These tell you about where each control is placed. Is it at a path junction, a lone tree, or a bend in a stream? Most importantly, they tell you what number is printed on each control – this allows you to check you’re at the right one.
Doing the Course
Find the start. It should have a banner saying Start next to it.
At the start, you’ll find a plastic box on a stick. The box has a hole in it. When you are ready, poke the end of your dibber into the hole. It will beep and flash to tell you that your time has started. Off you go!
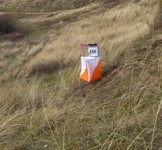
At each control you’ll find a white and orange control kite. It will have a number on it, like 125. Check that it matches the number you are expecting from the control descriptions.
The kite will have an orange clipper hanging from it. Use this to punch the correct square on your control slip. This proves you went to that control. Occasionally, we’ll be using dibbers throughout, but we’ll explain on the day if that is the case.
When you get to the finish, which usually has a big banner saying Finish, there’s another box on a stick. Dib into that and it will beep and flash to say it has stopped your time.
Downloading
Head back to the registration area. You will now need to get your time downloaded.
Give your control slip back to the person with the dibbers and put the safety pin back in the tub. You will be directed to dib twice more – each time a little printout will appear. One is attached to your control slip so we know you came back, the other is yours to keep along with your map.
Make sure you hand back your dibber.
Second Run
If there is time and you want to, you can try a different course. Go through registration again, starting from Step 1. This time you must mark it as non-competitive.